Hope everyone is doing well, and survived the March madness 🙂
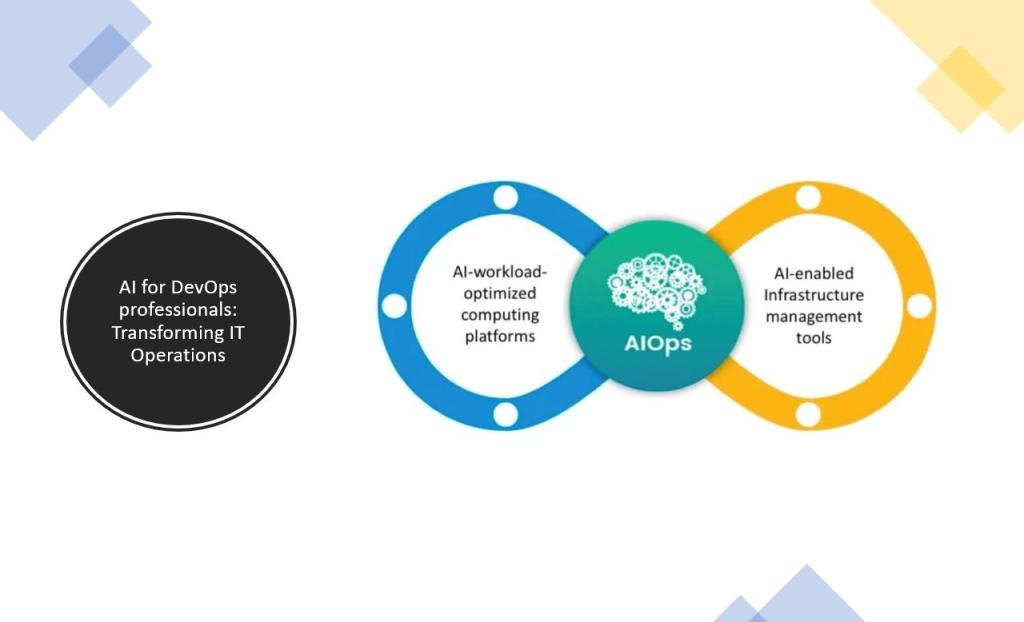
As you might be aware, our #CloudMarathoner duo (Elkhan & Martin) teamed up and rolled the sleeved to prepare two unique sessions on how to get started with IT + AI = AIOps.
These sessions don’t require any prior knowledge of AI, what you need is just interest to get started with fundamentals and start learning.
In the second session below, we covered the process, terminology and future of transforming IT operations with AI for DevOps. This session will help you in building your own organizational roadmap in revolutionizing DevOps for your mission.
Please. check out the recorded session below and let us know your feedback on the LinkedIn post. Thank you !!!
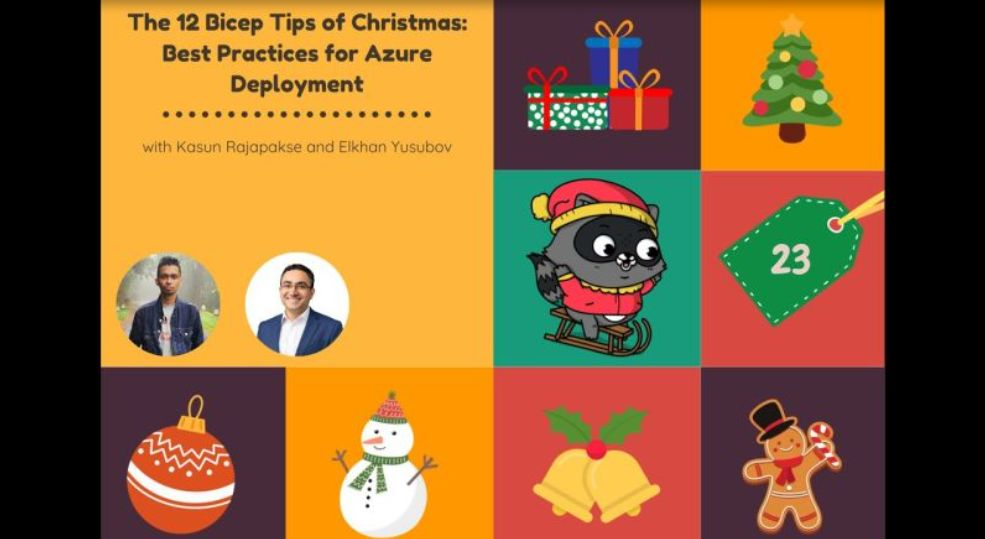
I hope everyone has a joyful festive season with family and has more than one reason to celebrate. In the spirit of the season, We (#cloudmarathoner community) rolled our sleeves and produced two sessions for the Fesive Tech Calendar 2023 event.
The first session – “The 12 Bicep 💪 Tips of Christmas: Best Practices for Azure Deployment” is done in collaboration with Kasun Rajapakse – a Microsoft Azure MVP and a #cloudmarathoner community contributor.
In this session, we invite you to take a trip to Azure with ‘The 12 Bicep Tips of Christmas: Best Practices for Azure Deployment.’ We encourage you to open the present of knowledge as we show you the ropes and help you use Azure Bicep to its best potential. By joining us you will spread good cheer for a prosperous and trouble-free Azure experience this holiday season in honor of efficient cloud management.
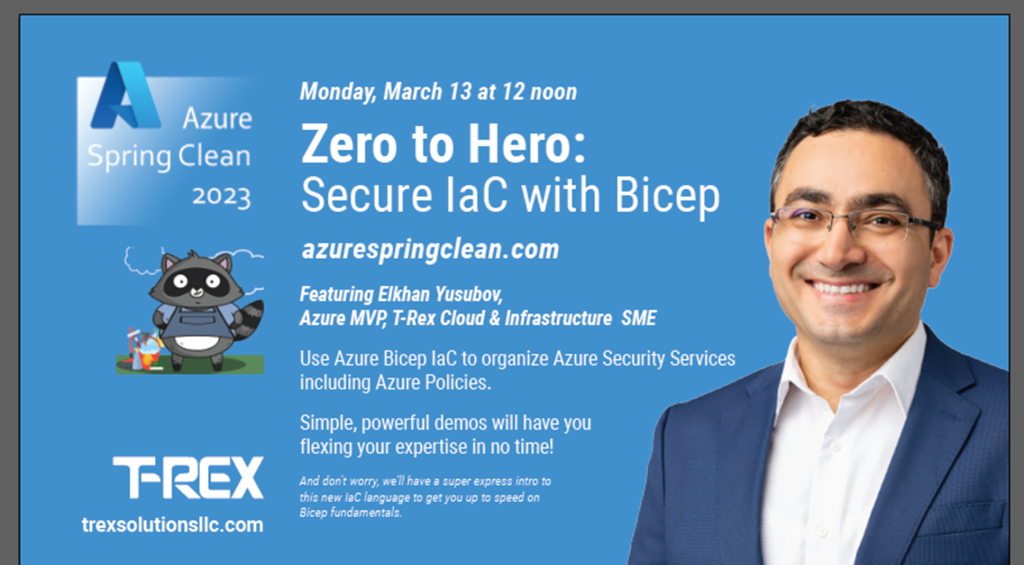
I would like to welcome everyone who is landed on this page to check out the Azure Spring Clean 2023 event and Learn new cloud skills!
Before kicking off the topic, I would like to start with a “THANK YOU” message for the organizers of the event; especially for Joe, Thomas, and everyone who is involved in making this event a successful experience for everyone!
Note:
Introduction
In the spirit of Azure Spring Clean, we will explore how to organize Azure Security Services using the infrastructure-as-Code (IaC) approach with Azure Bicep.
We will look into how you could declaratively define and deploy your Azure security resources including Azure Policies to tackle real-world business problems. So, get yourself ready for simple yet powerful demos that will turn you into a hero.
And don’t worry, if you are new to Azure Bicep as we will have a super express introduction to this new IaC language to get you started with fundamentals.
Azure Bicep is a new declarative Domain Specific Language (DSL) for provisioning Azure resources. The purpose of Azure Bicep is to simplify the resource creation and management experience with a cleaner syntax and more code reuse.
Declaring resources as IaC
There are many benefits in declaring and managing cloud infrastructure resources as a code. It provides benefits, such as increased compliance, visibility, controlled deployments and versioning of changes that get deployed into your cloud environments.
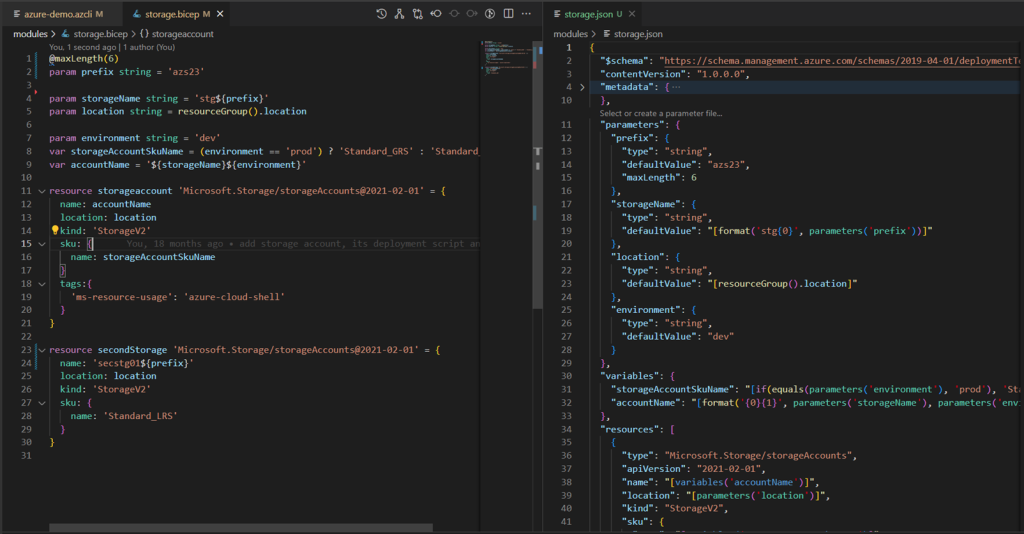
The following screenshot demonstrates how Azure Bicep declares cloud resources on the left side of the panel:
Organizing cloud resources
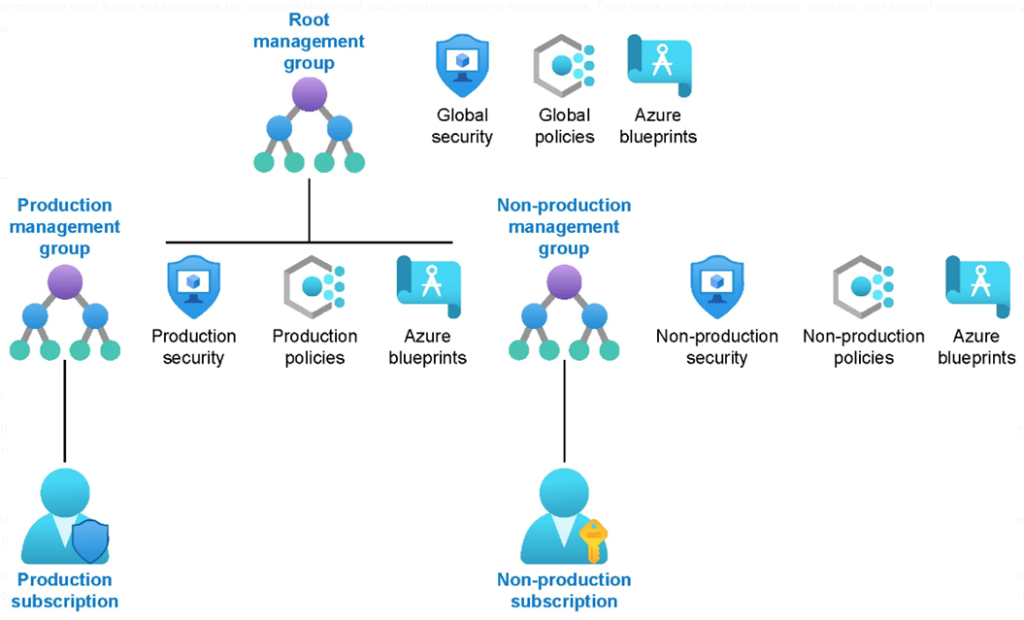
No matter how small or big is your project, taking time to think through the approach of how to organize your digital assets is an important task. In Microsoft Azure, you would need to consider a couple of points while trying to make this decision. Namely, you would need to consider the following factors:
Resource Governance approach
Management scopes
IaC management options
Modules, ACR, Template Specs, etc.
Azure Policies for governance
The Azure Policies are assigned with a unique mission to guard the compliance aspect of your cloud resources and workloads. It evaluates resources at specific times (by default happens every 24 hours) during the resource lifecycle changes and the policy assignment lifecycle updates.
Thus, whenever you get a resource created, updated, or deleted within a scope of the monitored compliance, or if you update/create an Azure policy then the compliance evaluation cycle will determine the compliance of these changes by auditing, blocking, or allowing the action to be performed.
Securing storage account options
Note: this section of the post is in progress… It will be presented with the screenshots and GitHub repo for you. Stay tuned, and check in a few days 😉
video & Demo – a sweet combo
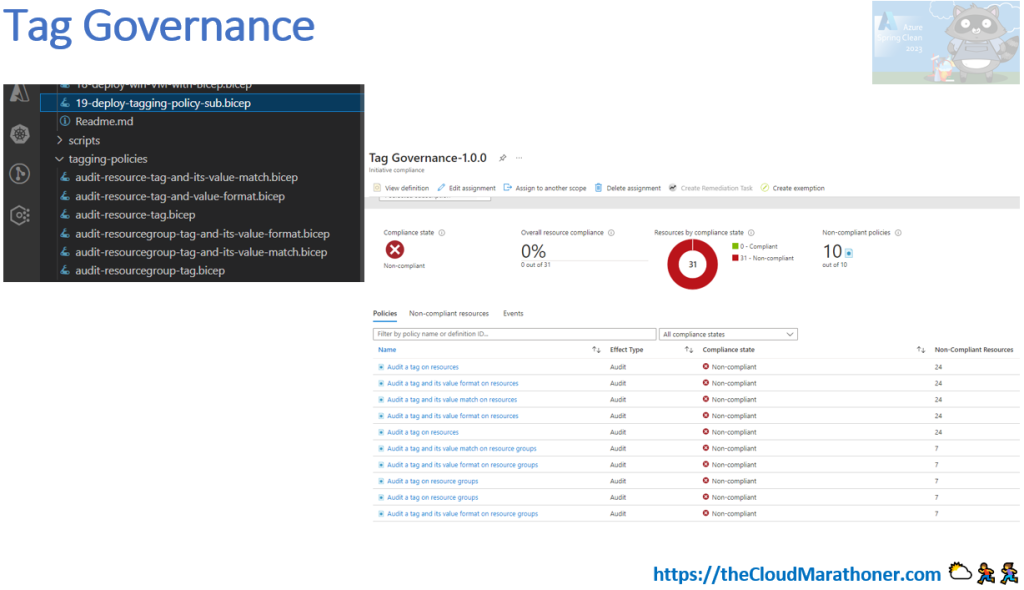
In the video below, I briefly cover the posted information in this blog post which also includes the instructions on how to run the demo and get the scripts to deploy Azure Policies for your Tag Governance scenario.
Without any overdue, here is the video that should be available to you:
The following image is a screenshot from the slide that demonstrates the Bicep code that declares the policy definition and initiative, with the final view of deployment on the Azure portal.
Thank you so much for reading this post and learning about Azure security and compliance and how IaC language Azure Bicep can help you in this journey. This is a bit different perspective to strengthen your resource/workload compliance on Azure using IaC approach.
Please, keep up the good work by securing your organizational and customer cloud environments!
I have been getting a strange error on the Azure Bicep Insert functionality on my laptop, while it was working as expected on my work laptop.
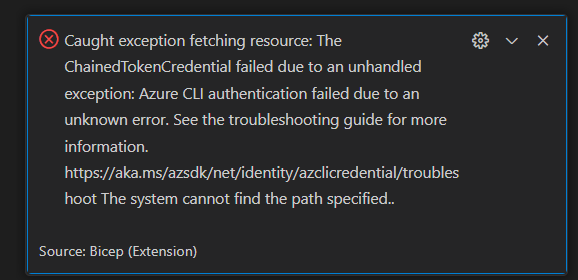
Thus, I started to compare Azure Bicep versions and extension plugin versions on VS Code. Even though, both have the same versions, I was getting the following errors:
ChainedTokenCredential failed due to an unhandled exception
“Caught exception fetching resource: The ChainedTokenCredential failed due to an unhandled exception: Azure CLI authentication failed due to an unknown error. See the troubleshooting guide for more information.”
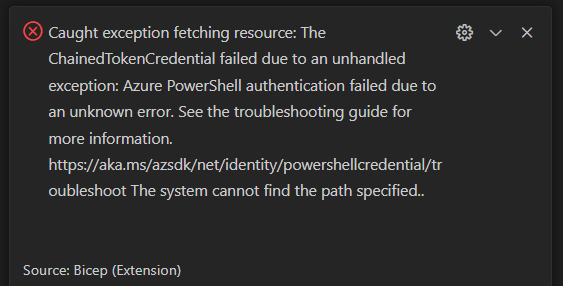
After a couple of hours of troubleshooting, I was getting a different error:
“Caught exception fetching resource: The ChainedTokenCredential failed due to an unhandled exception: Azure PowerShell authentication failed due to an unknown error. See the troubleshooting guide for more information.”
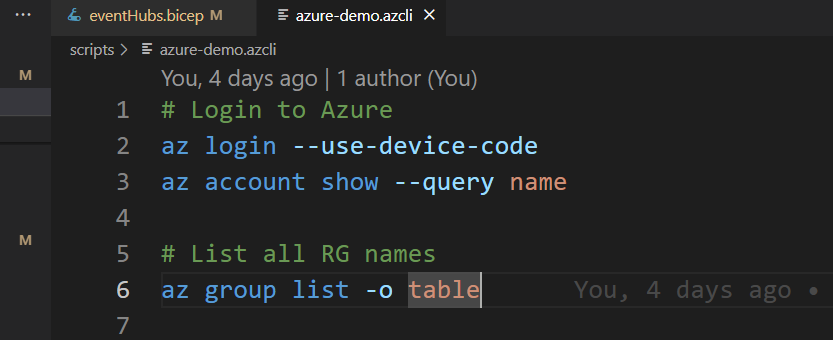
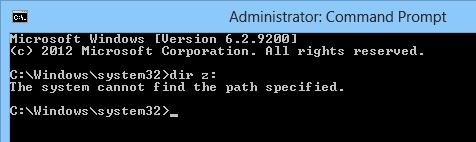
First thing first, I have eliminated the possibility of Azure authentication not working on my VS Code, by running the following commands and seeing the results:
Issues that helped to dig for a fix
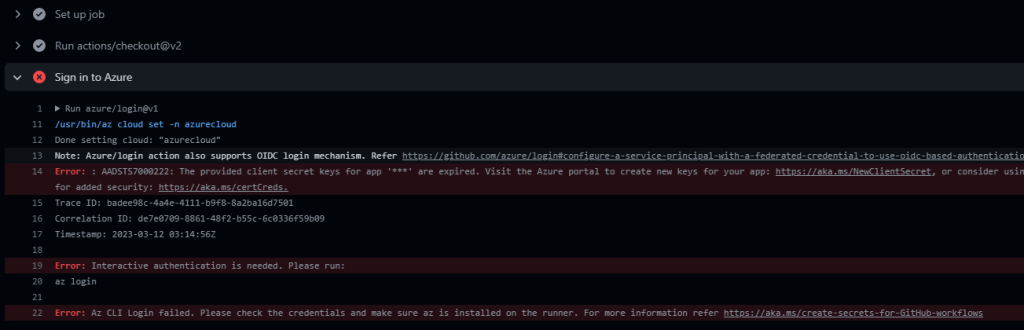
I was seeing an error: “The system cannot find the path specified.”. This was in my Windows Command Prompt and PowerShell consoles.
Here are the screenshots of the errors that I was seeing:
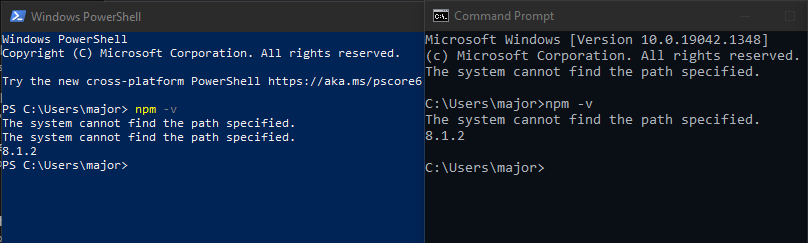
Resolving path issues
First, I checked all my paths in Environment Variables on my Windows laptop, and there were 1-2 unresolved paths that I removed.
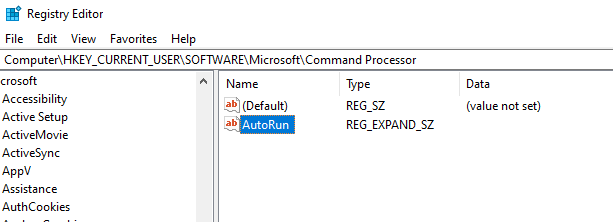
Cleanup of the Registry AutoRun
The next step was removing any Auto Run values that I may have in Win Registry. This last step was helpful to resolve all the errors on Windows Command Prompt and PowerShell.
In Summary
At the end of the troubleshooting and after a couple of hours of banging my head into the wall, I was happy that the Path and “ChainedTokenCredential failed” issues had been resolved.
Thank you for reading my post and I hope this post has helped you to troubleshoot the issues that you may have.
If your issue is still not resolved after following my post, please reach back to me.
In this post, I will be addressing a common an error that could be seen in your GitHub actions, once in a while, called “Error: Az CLI Login failed. Please check the credentials and make sure az is installed on the runner”.
I am very honored to prepare an Azure Bicep session for the Azure Dominicana meetup group and would like to thank Gregory for extending his invitation.
As you know, the Azure Bicep language brings a new Infrastructure as a Code (IaC) approach to managing your Azure resources in a clean way. In addition, we also have a classic ARM JSON template that is traditionally used to define Azure infrastructure resources in a declarative way. However, it is not easy to author and maintains ARM JSON templates when your project grows in complexity.
That is when Azure Bicep comes into play, to simplify the management of your infrastructure while re-using code. So, please join my session and I will explain to you how to start using Azure Bicep and easily manage your cloud infrastructure.
Azure Dominicana user group
“This Meetup is for all those interested in knowing and learning more about Azure and trying to keep up with the latest trends and new features. Let’s talk together about interesting topics in our language and let’s all grow together in new knowledge and experiences!” – according to the Azure Dominicana meetup page.
Summary
If you are also excited about this session, please register here. I hope to hear from all of you in this session and address the questions that you may have.
Updates
Please, check the meetup homepage as I have been told that the session recording is going to be uploaded soon. Thanks!
I had a great joy while interacting with a number of attendees. Thank You for checking this blog and please feel free to reach out back with your questions.
As you might know, the Azure Bicep language brings a new Infrastructure as a Code (IaC) approach to manage your Azure resources in a clean way. We also have a classic ARM JSON template that is/was traditionally used to define Azure infrastructure resources in a declarative way.
However, it is not easy to author and maintain ARM JSON templates when your project grows in complexity.
A demo screenshot from the session
But, I have good news for you – Microsoft infrastructure team has been working on new language to ease this process. Thus, an Azure Bicep language is created to simplify management of your infrastructure while re-using the code.
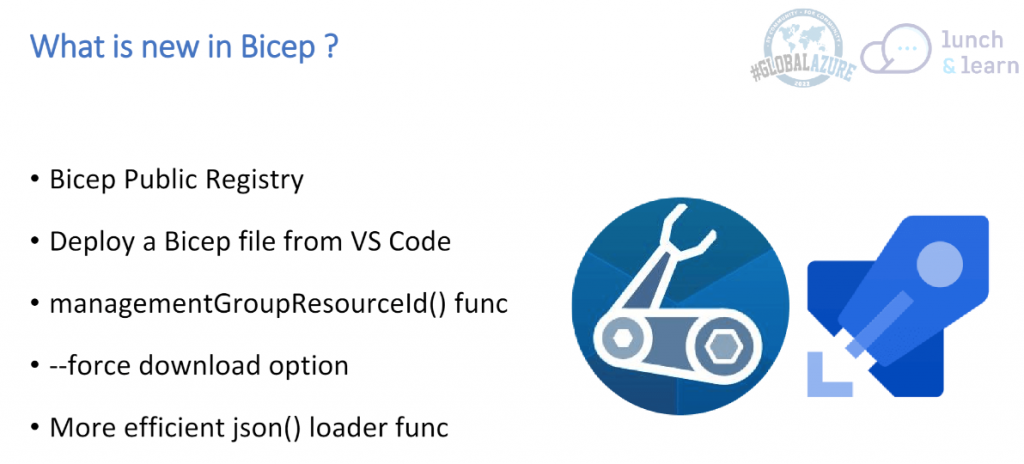
In this, I have introduced new features and capabilities of Azure Bicep v0.5 & v0.6 language. You also see demos on how it is simple to create, manage a modularized Azure infrastructure-as-code, while using familiar tools and extensions on VS Code.
A screenshot from the slides
If you missed this session, no worries, you are covered, as this session was recorded. It is freely availiable on the #cloudmarathoner 🖐 ⏩ YouTube channel here.
The slides and as well as links to the recommended resources are posted on my 🖐 🍴 GitHub repo here.
Please, feel free to check up this GitHub repo, share & fork it as you like 👍
The infrastructure-as-code (IaC) is not a just a “buzzword”, it is brought by a necessity to manage your digital estate more predictably while source-controlling the changes that are introduced over time. In its turn, this approach makes it easier to keep your workload environments compliant and saves ton of time in troubleshooting, development and auditing your resources
In this post, we will look into the necessity of child resources in Azure and how Bicep language simplifies their management and declaration as a code.
why azure bicep child resources?
There are a number of scenarios where it makes perfect sense to declare resources within the context of their parent. For example; storage blob containers could not be declared and used without a parent storage account.
In addition to Blob containers, there are many other child resource types in Azure like:
Virtual network subnets
SQL databases
Azure Cosmos DB containers
SQL databases
VM extensions
How could you define child resources?
Unsurprisingly, there is more than one way to define Azure Bicep child resources. Each approach will depend on a specific use case that you or your team is looking forward to delivering.
Further we will use the example of a storage account resource to describe different options of child resource declarations. This will make it easier to describe the concepts and available options to you. However, these concepts could be easily used on other Azure services like VMs and VNets that do have child resources too.
Option-1 : Child resource created with reference to parent
Our first option is declaring a child Blob container resource as a separate independent resource with a reference to a parent resource. Like, it is illustrated on the example screen-shot from the Learn-Bicep repo.
For this option to work, we would need to declare an Azure Storage Blob service too. Let’s look into how it could be done while considering a second option.
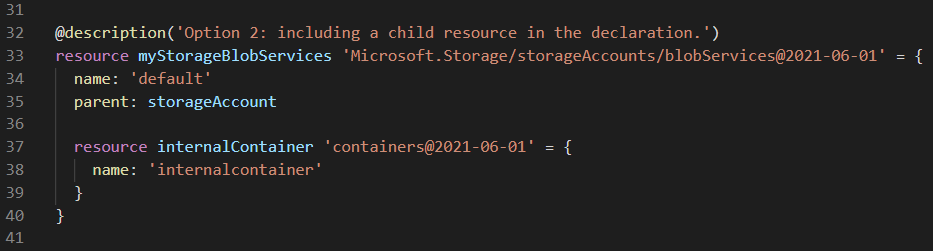
Option-2 : Including a child resource in the declaration
Our second option is declaring a Storage Blob service resource as a separate independent resource with a reference to a parent Storage Account resource. Then it has an inner declaration for a container child resources within the Storage Blob service.
Let’s look at the example screen-shot from the Learn-Bicep repo.
This option might be an ideal approach if you have few child resources in your declaration. However, it would not be the most efficient one to use, if the number of child resources you are required to deploy is in dozens, hundreds or even thousands.
Option-3 : Automation and looping with enumeration 🙂
The final option will serve you well, if you have 100s of pre-defined containers that should be deployed into your Azure environment.
By leveraging the “iterative loops” in Bicep we can easily iterate over these containers while creating them in a compact and repeatable manner, like in the following screen-shot from the repo code.
Looking for more Bicep goodness?
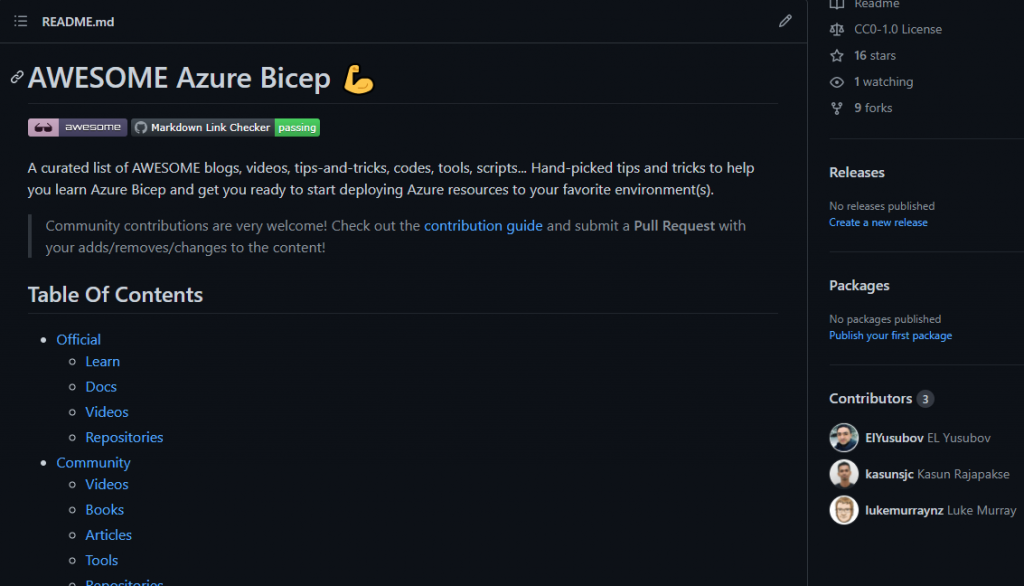
A community of developers and engineers started a great initiative – to help everyone to learn Azure Bicep for #free by sharing & contributing to the AWESOME-Azure-Bicep GitHub repo.
As you were informed in my last post, I have published a new GitHub repo to help the community and new learners with Azure Bicep resources. The new repo – AWESOME Azure Bicep 💪 is getting a high interest from all of you.
Thank you very much for accessing, starring ⭐ and forking 🍴 it! If you learn about it now, please check it out here.
And this is not all. We have plenty of room to grow this repo with the latest contributions from you.
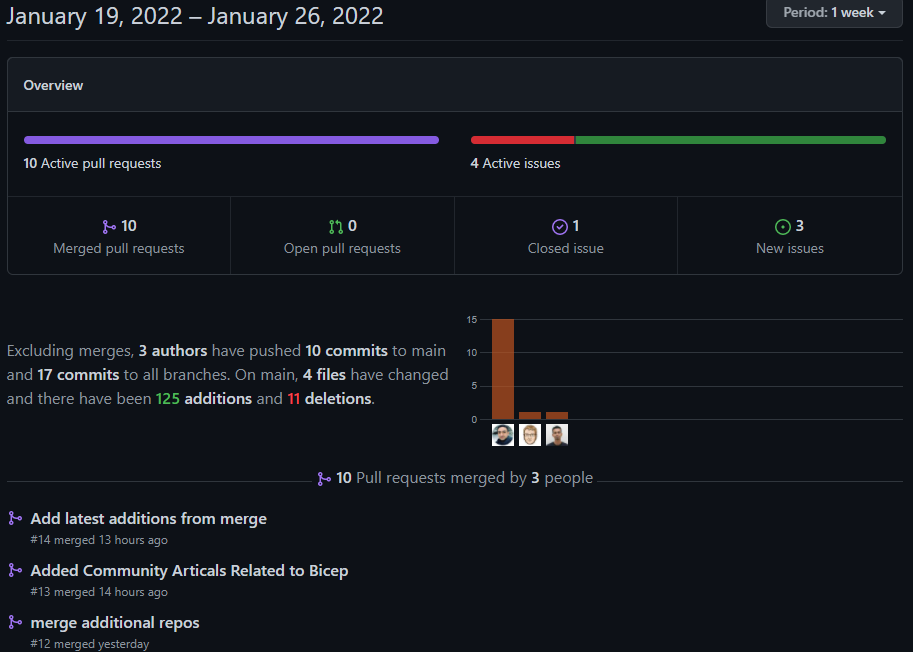
Two new contributors
In less than a week, we got two great contributions from Kasun Rajapakse and Luke Murray 🙌. Thank you very much for your contributions!
Get started with Azure Bicep
Let’s step-up your game and start learning the latest 🚀 Azure #infrastructureascode language (aka, Bicep). I sincerely invite you to become a part of this really great “learn and share” initiative of Azure Bicep.
Share your interest and knowledge with the community by opening your very first GitHub PR.
Looking for a video course on Azure Bicep ?🤔 >> Azure Bicep First Look 👉 https://lnkd.in/eWsxf3hj is here to help!
Summary
This project is growing and let’s become a part of this Azure Bicep community !
Ready to make your first PR to Awesome Azure Bicep repo? Please check out the contribution guide or reach out if you need help in this process.
Every seasoned IT professional knows that sensitive information should not be exposed as a clear text on any code. This is especially true for infrastructure-as-code (aka, IaC) scenarios where passwords and keys are part of the deployment.
One way to stay compliant in accomplishing this goal is the integration of an Azure Key Vault service into your deployment code. This Azure security service is primarily intended to store sensitive information like password, keys, certificates, connections, etc.
In this post, we will look into two different ways how we could integrate Azure Key Vault services in our Azure Bicep code.
Option – 1: Using getSecret() function
Our first option is to delegate this important work to a getSecret() function. This option could be used with an existing Azure Key Vault resource that is declared in your Azure Bicep code.
Let’s look into an example where an existing Azure Key Vault service is referenced to provide administrative password for SQL server deployment.
Deploying Azure SQL instance with Azure Key Vault
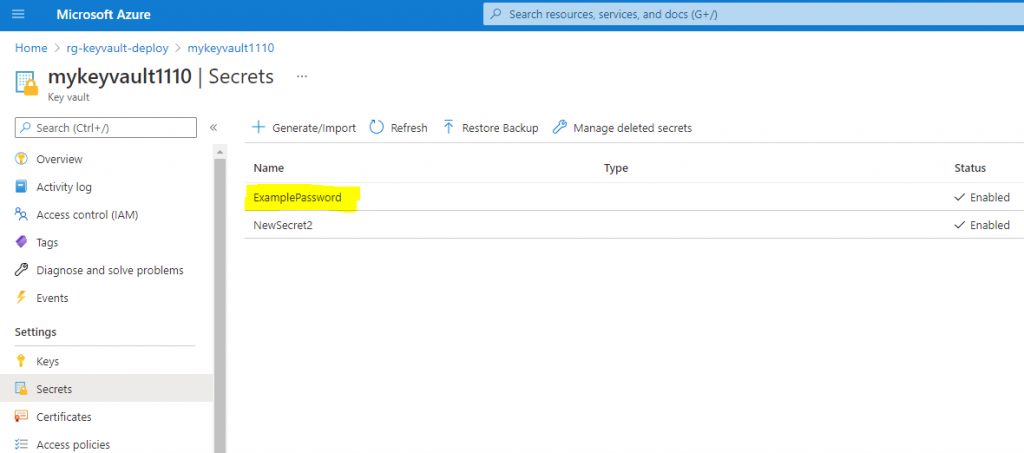
This sample Bicep code is using sqldb.bicep file as a module, where parameters; such as sqlServerName and adminLogin are passed through with a secret name of ExamplePassword.
The ExamplePassword secret name should be already set and ready in the referenced Key Vault service above. Here is the view of this secret on Azure portal.
Azure Key Vault with secretes in portal
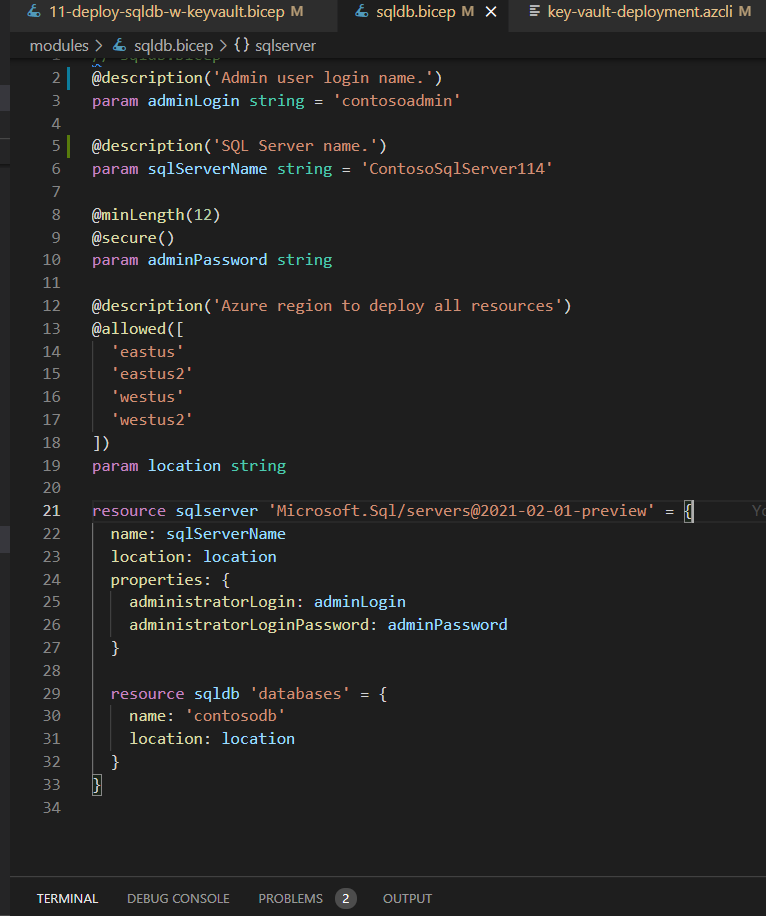
Let’s have a quick view into the sqldb.bicep file, as it is referenced in the main Bicep file.
sqldb.bicep file
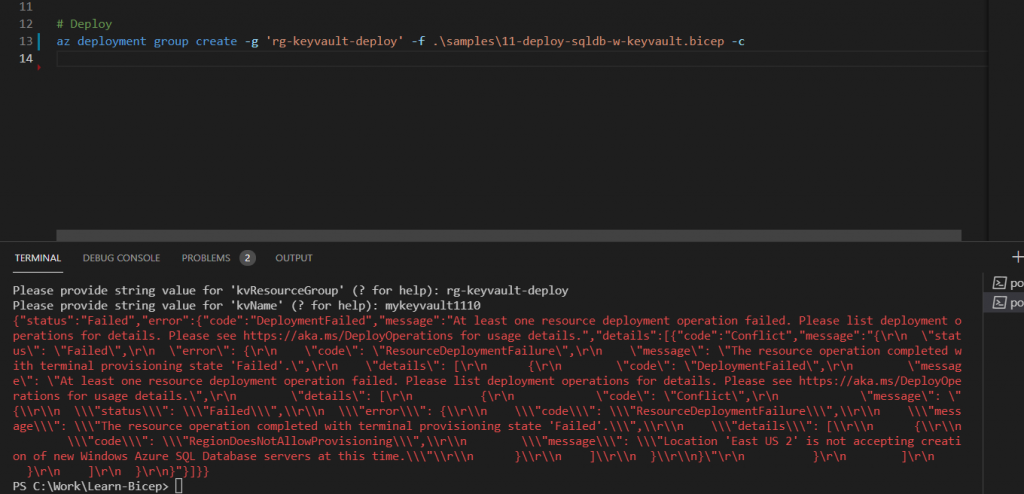
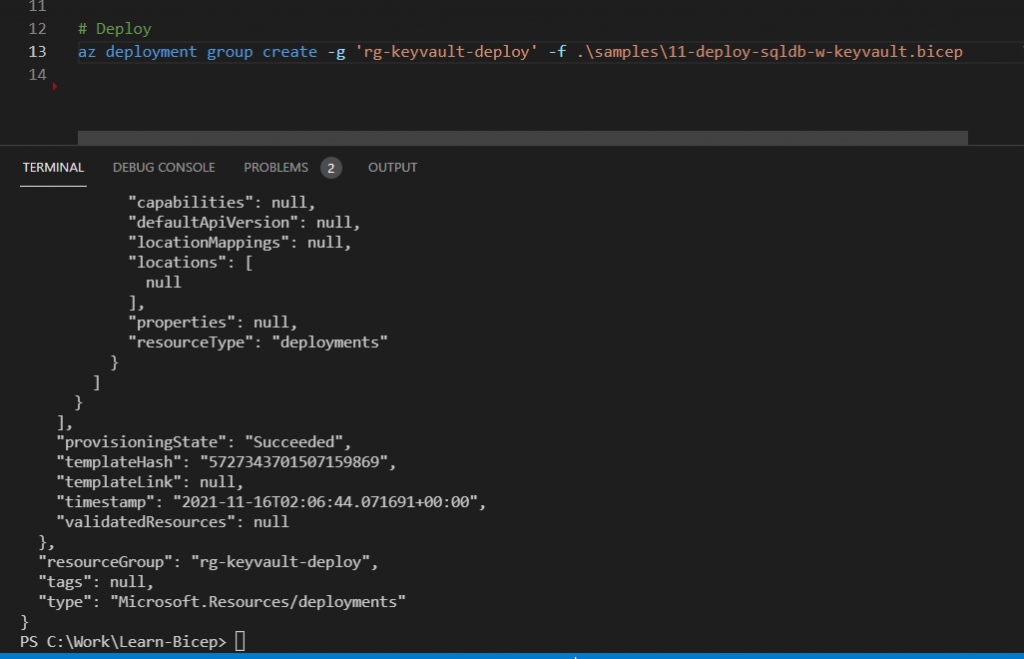
Now, let’s deploy these resources with a secret value from Key Vault resource that has a secret name ExamplePassword.
What happened? I am getting an error on my first deployment execution 🙁
Error on deploying Bicep code with SQL server provisioning
Upon carefully analyzing error, I see the following reason for this error:
At least one resource deployment operation failed. Please list deployment operations for details. Please see https://aka.ms/DeployOperations for usage details.”,”details”:[{“code”:”RegionDoesNotAllowProvisioning”,”message”:”Location ‘East US 2’ is not accepting creation of new Windows Azure SQL Database servers at this time.
Azure deployment error
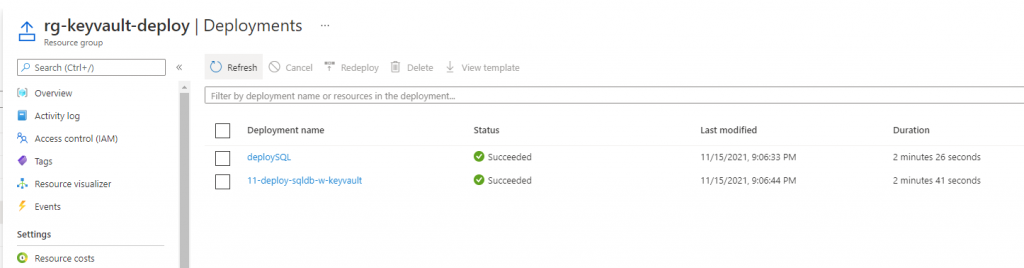
Based on the error message, we change the location to eastus and re-run the script. Now, we got the following positive result in console and portal:
Deployment results in Azure Portal RG
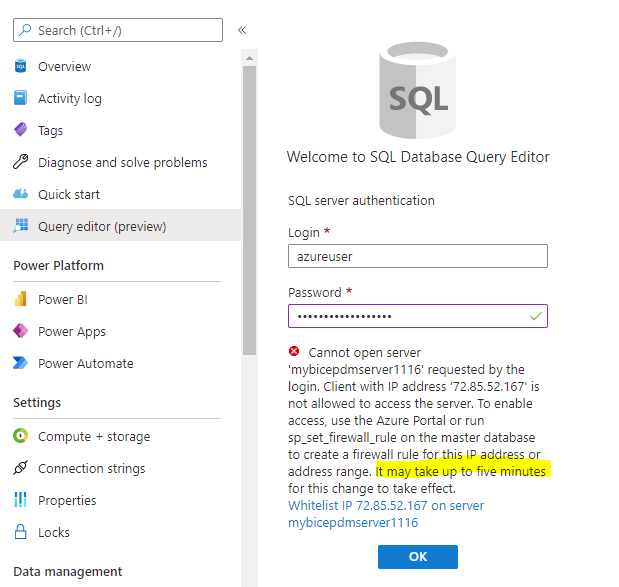
Next, we will attempt to login into a SQL Server instance. A successful login will look like the following screen:
Successful login into the SQL instance
Important Note:
If you are getting an error during the login then try to check the following steps:
adminLogin name is entered correctly
your IP address is added to the SQL server firewall rules
grab a cup of coffee and check back in 5 minutes
Description of a typical login error into a SQL server instance is provided below. I checked the firewall rules and made a cup of coffee => before getting a successful log-in 🙂
Requires your location IP activation
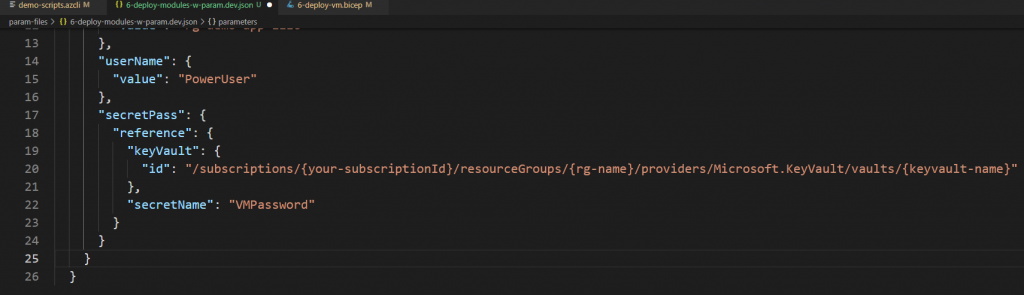
Option -2: Referencing as a secretName in parameter
The second option is pretty straightforward, if you have already used it on ARM template deployments.
We just need to reference Azure Key Vault secret like in the following example:
Using a parameter file and referencing the Key Vault secretName will do the trick in extracting the value and provisioning your resource.
Let’s run the bicep file that deploys multiple RGs and an Azure VM that uses VMPassword secret.
Running deployment with Bicep parameter file
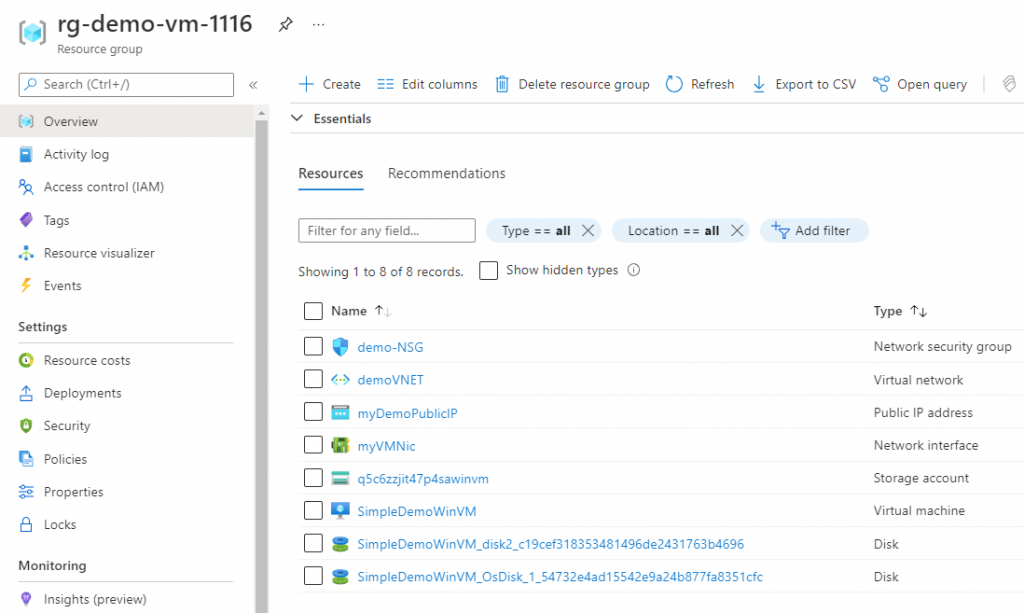
A successful deployment provisions following RG with the VM resources:
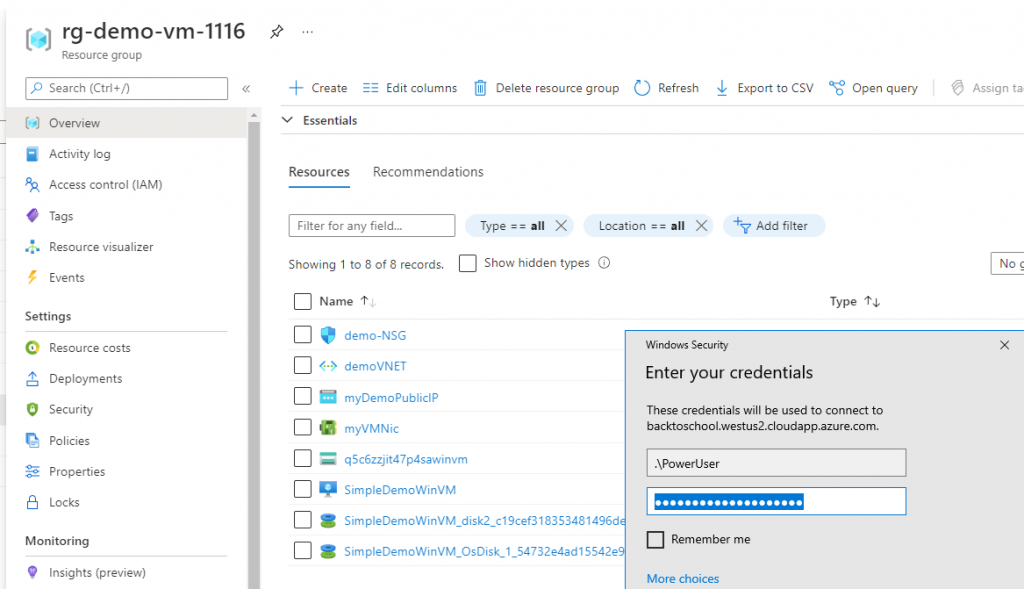
Next, we should smoke test our deployment by locating the resource group “rg-demo-vm-1116” and using deployment parameters to RDP into Windows server:
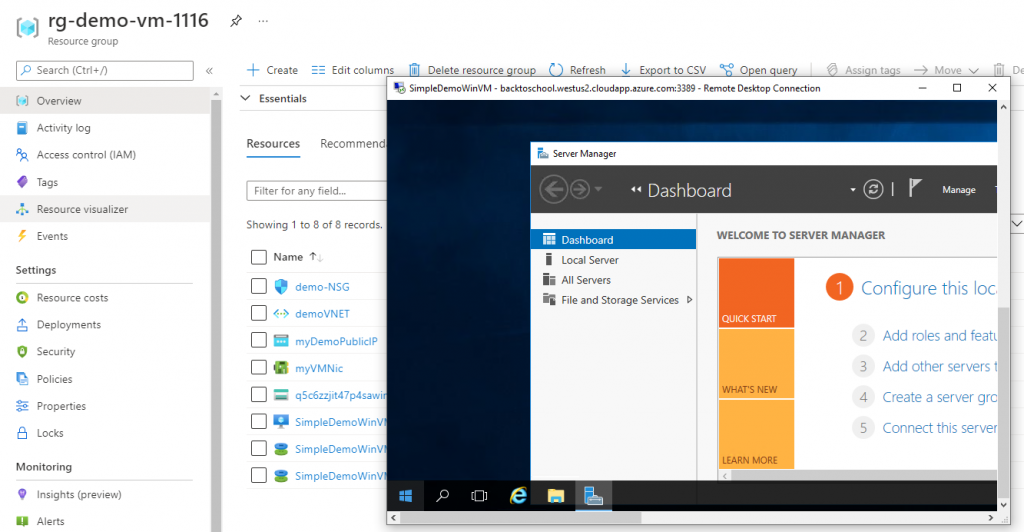
Finally, we are able to see that secret and admin user name pair worked as expected
Azure VM deployed using Key Vault secret
Summary
In this post, we looked into two available options that harden our infrastructure code by removing hard-coded sensitive information and replacing it with Azure Key Vault reference. Thus, avoiding any potential leaks of passwords, secrets, etc.
IMHO, first option is better than the later one, because it does not expose subscription id and other small details.